Herringbone tile pattern is a current, yet classic trend. I’m sharing a recent bathroom remodel using it, as well as 6 of my best tips for designing a bathroom.
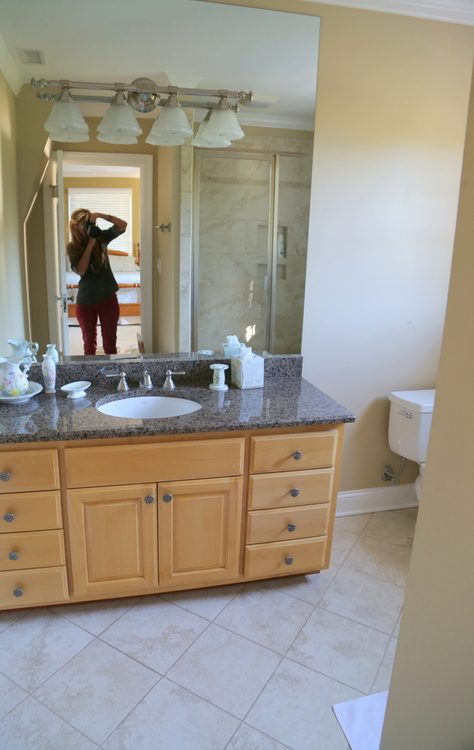
This is a remodel of a guest bathroom in a client’s home that turned out really lovely, and I just can’t wait to show you! Here is how it looked prior to the makeover:
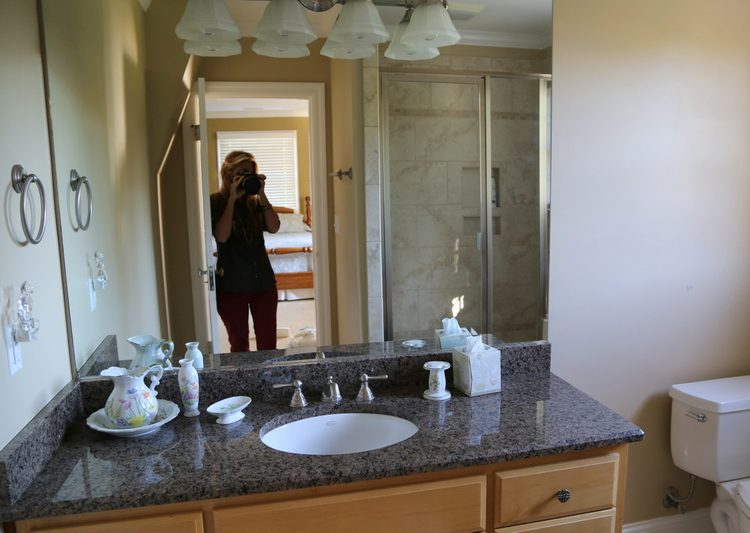 before
Before I show you the finished results, here is the punch list of the updates we wanted to make:
- lighting
- fixtures and hardware
- cabinetry
- sink
- flooring
- shower door
- shower tile
- mirror
- paint
So pretty much EVERYTHING. Except the floorplan. So what do you choose first?
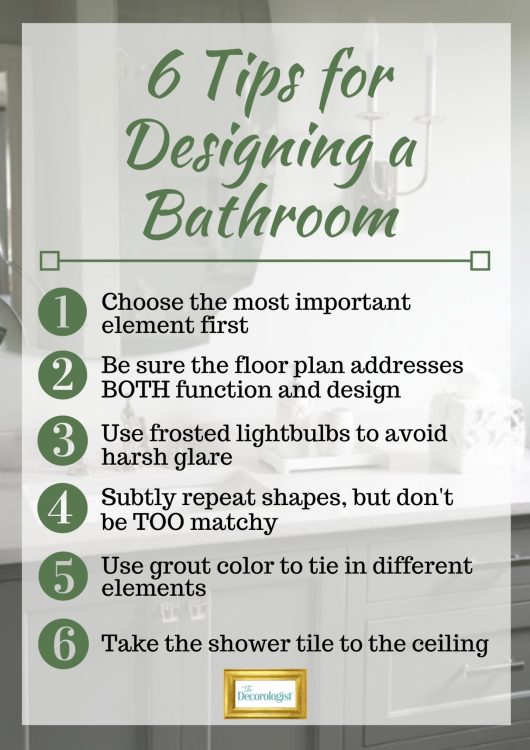
1. Choose the most important element first.
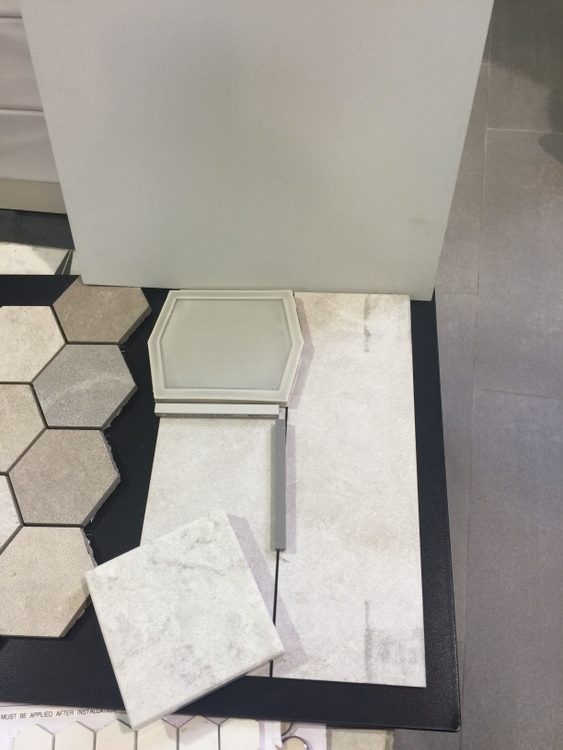
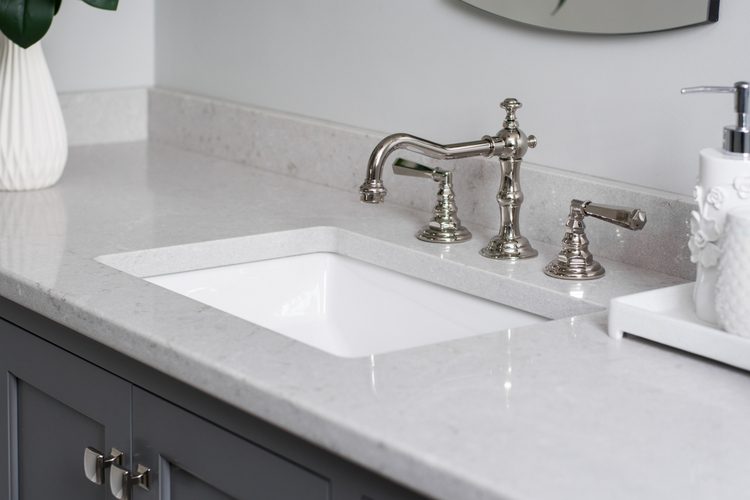
For bathrooms, I typically start with the countertop material. It’s an important choice, and it’s often a costly one. Changing from granite to quartz provided a cleaner, classic jumping-off point for the rest of the room’s design. Next came the decisions for flooring and shower tiles. I suggested a herringbone tile pattern, so we chose a long subway tile to lay in the pattern we wanted. A darker grout makes the herringbone pattern more pronounced.
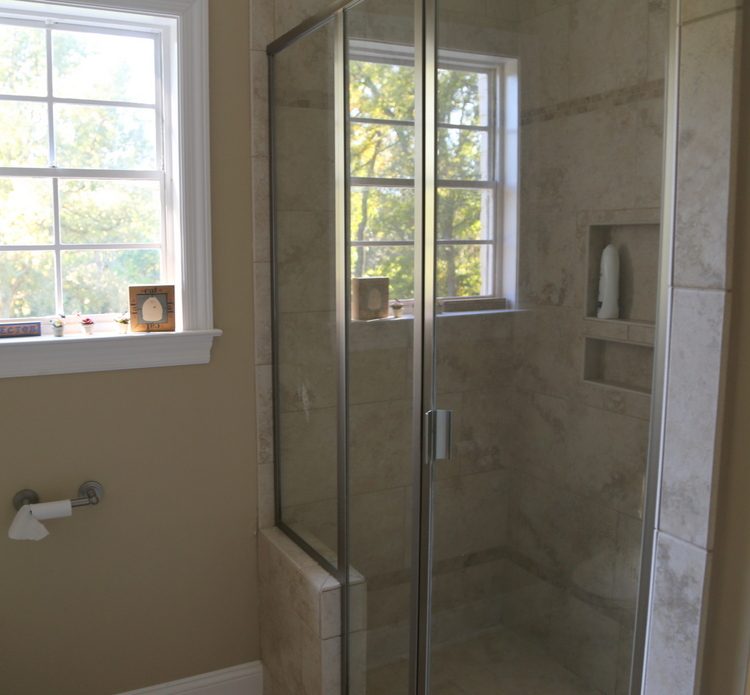
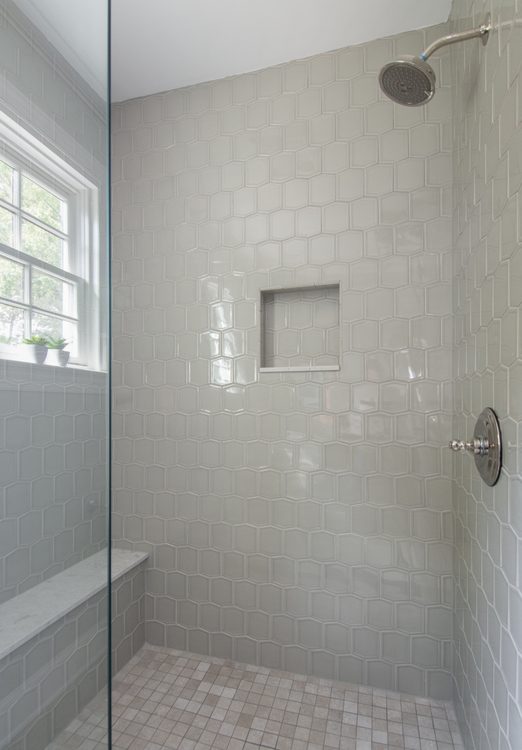
In this small bathroom, it was important to reduce choppiness in transitions. My client wanted a seamless glass shower door, so the flooring of the bathroom and the flooring of the shower needed to play well together. We chose a hexagon with color variations that blended nicely against the floor tile. We chose a wall tile that is a larger, flattened hexagon. We decided to run it vertically for the best effect.
The contractor planned for a larger vanity cabinet, but drew out the plan so that the new sink would line up with the doorway of the bathroom. Which brings me to number 3:
2. Be sure the floor plan addresses BOTH function and design.
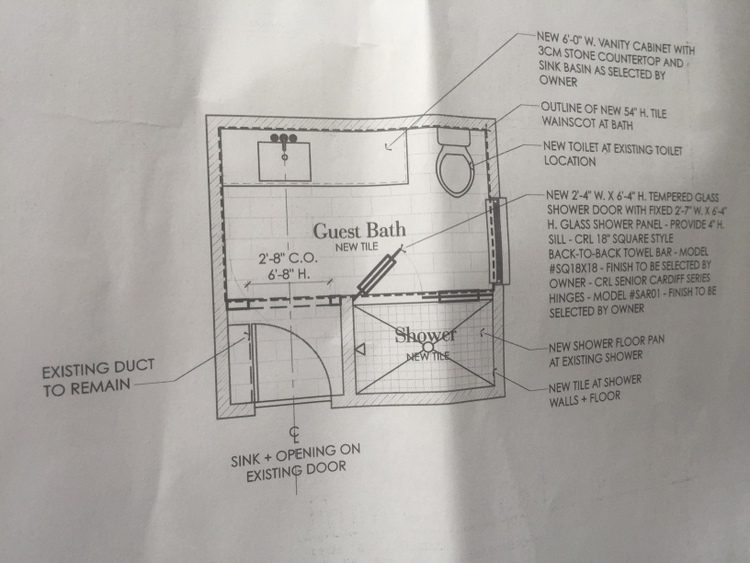
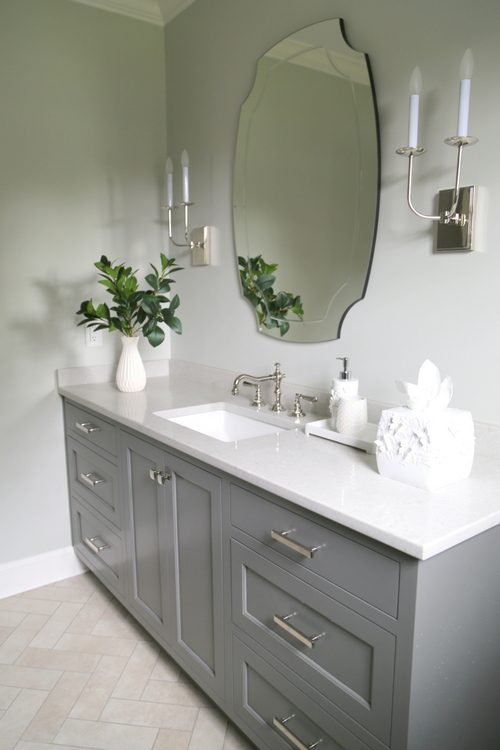
I suggested we instead center the sink on the new vanity so that we could add beautiful sconces on either side of the sink. Yes, sconces are really “trendy” right now. But I consider them a classic and timeless alternative to over-the-mirror light fixtures. Plus, the lighting they cast is better and more flattering for doing hair and makeup! In addition to all those things, placing the sink and mirror off-center to the vanity cabinet would create an awkward negative space on the wall to the right of the mirror (unless we went again with a large plate glass mirror).
Below you’ll see a photo after the flooring went in. The color sample you see below are painted SmallWall® sample boards, which is my favorite tool for testing paint colors. They are also great to take along when shopping for tiles, countertops, fabrics, etc. I never have any doubt whether or not the new additions will work when I have my SmallWall® boards with me. The ones you see here are painted out in the colors I chose (from left to right) for the vanity cabinet, wall, and trim for the bathroom.

If you’d like to purchase SmallWall® sample boards, you can find them at any Sherwin-Williams stores in packs of 2. Or, you can purchase them in contractor packs of 50 exclusively here.
Alright, are you ready to see how things came together? Let’s start with the before:
 before
And now for the lovely and sophisticated after:
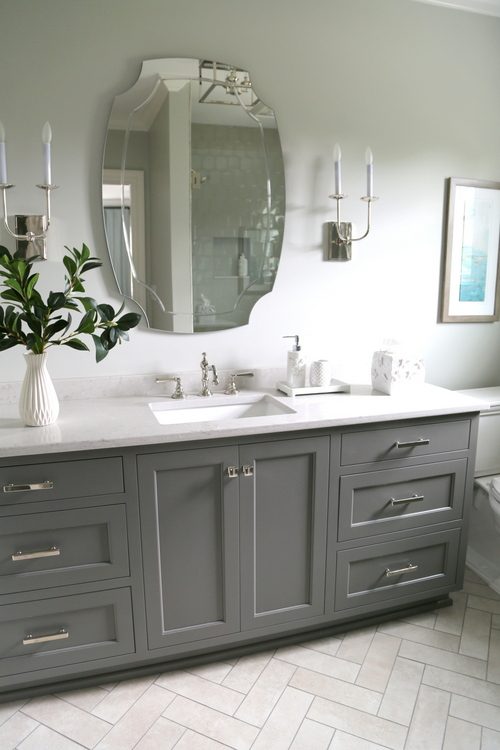 design by The Decorologist
It was definitely time for a change:
And the homeowner is thrilled with the transformation. And so am I! All the fixtures are polished nickel – a finish that is between satin nickel and chrome. With sconces or overhead lighting, this seldom-followed tip is important:
3. Use frosted light bulbs to avoid harsh glare.
 Sq Ft Photography
No one wants harsh lighting when they are peering into a mirror, amiright??
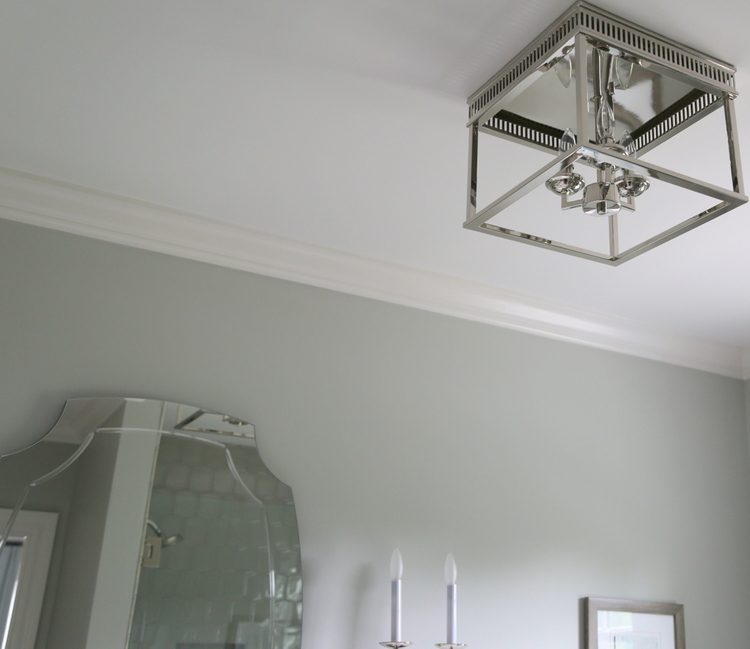
I love this ceiling light fixture soooo much. I recently used it in another client’s master bath, paired with different sconces.
 Another important tip has to do with repetition:
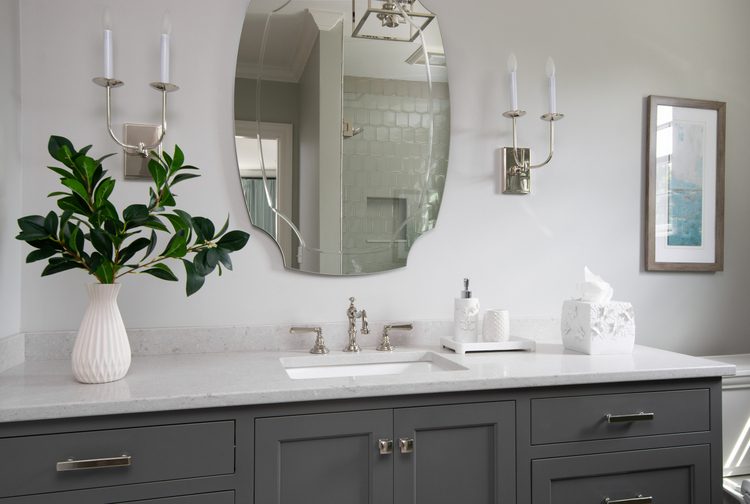
4. Subtly repeat shapes – but don’t be TOO matchy.
The mirror intentionally echos the shower wall tile, which you can see a bit in the reflection (along with me).
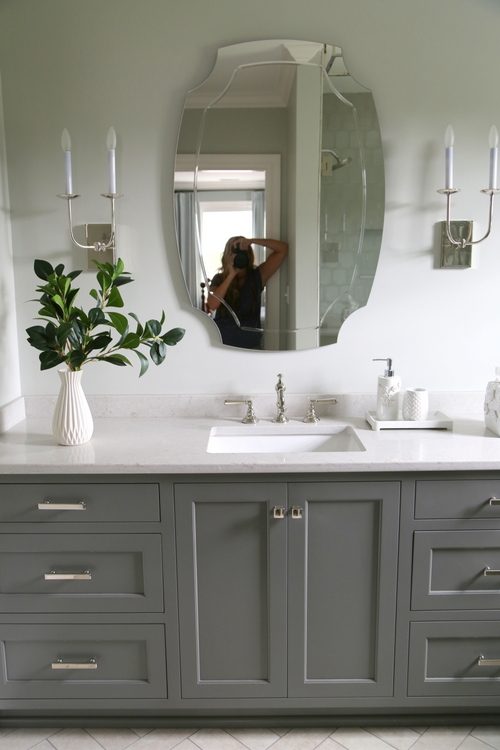
The dark gray cabinet is the perfect foil for the polished nickel finishes.
 Sq Ft Photography
5. Use grout color to tie in different elements.
The dark grout between the herringbone tile pattern is a perfect match! You can really see that better in the photo below:
And do you notice another bit of subtle repetition of shapes (tip #4)? The herringbone tile pattern is created from long, rectangular subway tile – which is a subtle repetition of the drawer shapes, insets, and pulls.
Take a look at the shower before:
 And now, the after:
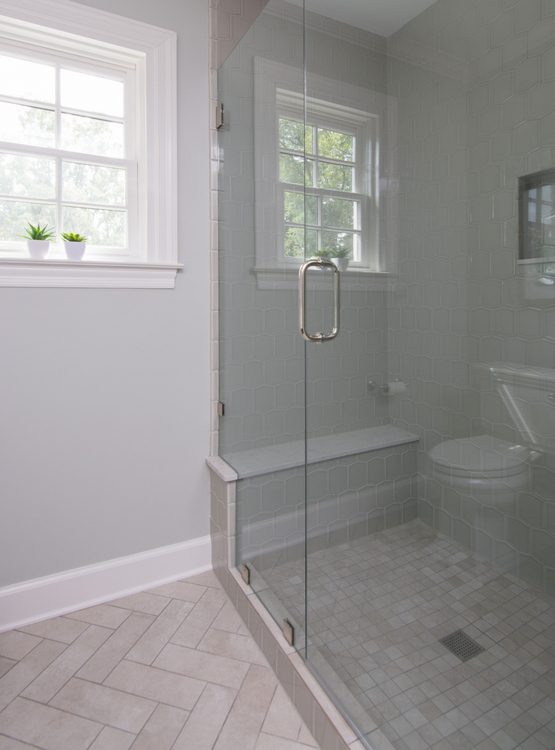
See how nicely the flooring transitions? Again, keeping the grout color the same really helps tie the two tiles together even when the shapes are different.
And one final tip:
6. Take the shower tile to the ceiling.
 Sq Ft Photography
It makes the ceiling appear taller and the shower or bath appear more spacious, in general!
I hope you like this transformation as much as I do. How do you like the herringbone tile pattern on the floor?
I’ll leave you with a nice little pinnable graphic with my tips for designing a bathroom:


Love it! Such a refreshing an up to date change- it’s beautiful!
We are actually doing herringbone pattern in my master right now as well-
Are you?? I can’t wait to see it!
Wow, very nicely done. Do you work with people in the Gallatin, TN area?
Hi Terrie,
Unfortunately Gallatin is out of my range, but I appreciate the complement! You may want to check out Superior Construction and Design. Elizabeth Scruggs is great and works out of Lebanon!
What color/sou use on the walls and the vanity?
I’m sorry, Ceil, but because this was a custom project for a client, I can’t tell you the exact paint colors! Generally, clients don’t want their designers to give away what they paid a fee for. Sorry!
Just beautiful!! Help me understand why the tile from the main area wasn’t continued into the shower floor?
Great question, Julie! Small tiles with lots of grout lines is much more slip resistant in a water-immersed situation, like a shower, so that is what is always recommended. The larger tile on the bathroom floor would be dangerous in a shower!
Can you tell me where you got the light fixtures. I can’t find anything I like. Thanks
Hi Kathy,
Those fixtures were chosen from a local lighting store, Grahams Living, in Franklin, TN.
Thank you.
I love the colors and transformation. Centering the sink was a great move! How do you deal with a window in the shower? Is there a special paint you suggest – it seems the moisture could be a problem.
Thank you, Jude! First of all, there isn’t a window in the shower. It’s on the wall beside/outside the shower, but you may be seeing the reflection from the shower glass door! Regardless, some painters like Sherwin-Williams Duration paint for bathrooms, but they also have a line that is specifically for bathrooms and high moisture areas. The higher the sheen (gloss), the better it will hold up. You may want to ask your local paint store which product they recommend for high moisture areas. Hope that helps!
You made the bathroom more elegant by selecting the right tiles that complement the space. Great job!
Thanks, Larry!
Absolutely Lovely!!!!!!! And, “Yes!”, to bringing shower tile up to the ceiling. For some unknown reason, I did not do this in my pool bathroom redo a couple of years ago and now it’s the first thing I see when I walk in there – and not in a good way. 😐 Again, this bathroom is stunning.
Thank you so much, Joanne!
I was thinking about the repetition of shapes too – in this case the square mounting plates for the sconces, the square/open cube styling of the ceiling fixture, the square knobs below the sink and the square hardware holding the shower glass. Subtle but harmonizing!
Wendy,
I almost wrote those exact things in the blogpost, but I kinda hoped some one else would notice!!! You get a gold star! 😉
This has to be one of my favorite projects that you have shared. It is elegant yet user-friendly. Well-done!!
Oh wow, what a complement, Beth! Thank you!
I normally do not like traditional hexagon-shaped tiles, which are very much on trend now; however, the modified hexagon tiles in the shower are really lovely. Love the little shower bench that will be perfect for shaving legs. 🙂
I think many people would have wanted dual sinks, but having more counter space is my preference, with the bonus of only having to clean 1 sink! I’m assuming the vanity is a custom piece. The inset drawers look rich and will provide wonderful storage.
Absolutely agree about taking tile to the ceiling in a shower.
Thank you for sharing your thoughts, Lisa! I have used this tile in a different colorway before – except I ran it in the other direction. To keep it from being too busy, we did a grout that closely matched the tile itself!
Just gorgeous! I’m wondering which wall color you used- is it in our box of colors? In some photos it appears grey and green in others. Seeing this makes me want to change out some of my light fixtures in my master!
Can you please share name, color and size of tile for flooring? If a fee is involved for information like this please let me know and I will be happy to pay.
Yes! I would also like to know the name of the tile
Yes please. Can you please share the size of the floor tile you used? Looks like you used two different sizes? Thank you!
I wish I could find a great vanity like that! It’s exactly what I’ve been looking for. Did you purchase or was it built?
I am also interested in the tile used in the main floor area, the herringbone. What size is it?
Is the floor tile a mat finish?
Are the shower wall tiles glass?
Did you start with the quartz countertop to coordinate the shower wall & floor tiles?