If you’ve ever built a home, you know that choosing overhead lighting from scratch can be a tricky thing. So many options, so many styles!

Your overhead lighting needs to work well together, but you don’t want a matchy-matchy lighting that look like it came in a boxed set from Home Depot. And what if you have an open floorplan? You want interesting fixtures with personality, but you don’t want them to look hodge-podge, right?
Perhaps I can help:
1. Start with choosing the most important or dominant light fixture/fixtures.
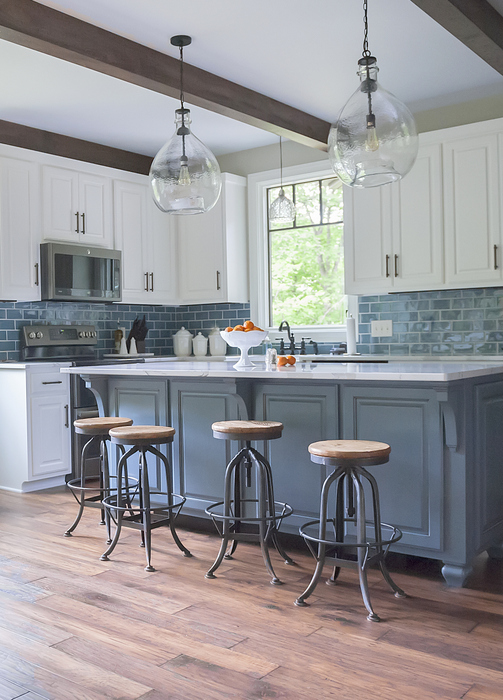
In this open-concept new build I recently worked on, the kitchen is the centerpiece of the home. So the pendants over the island were the most important choice to the homeowners. A pair of oversized pendants is a more current look than three smaller ones, so that’s what I recommended. They fell for these blown glass and iron pendants, which are perfect for this modern farmhouse kitchen.
2. Vary the next fixture, but repeat the shape and finish of the first.
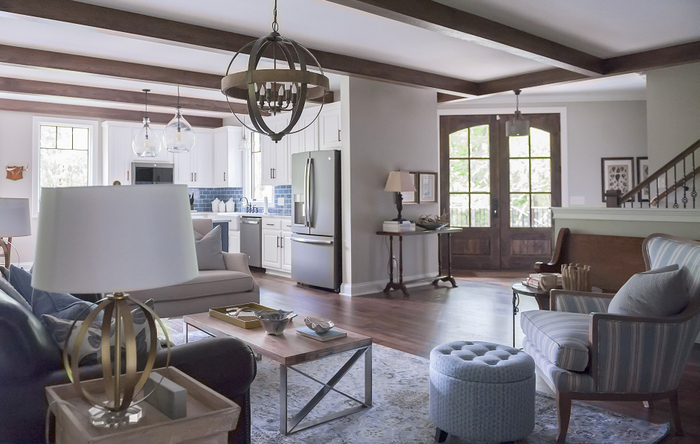
After that initial choice was made, we had to decide what overhead lighting should be the focal point of the adjoining living space. This iron and wood orb fixture works – do you know why? The fixture repeats the shape (round) and the finish (iron) of the island pendants are rounded and have an iron finish, and the wood banding echoes the wood beams and other wood finishes in the space.
Melanie G Photography
3. Choose a different style fixture while maintaining either the finish or the lines of the previous ones.
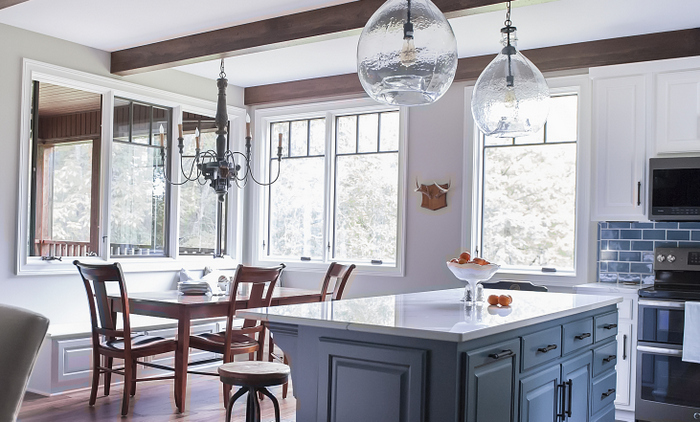
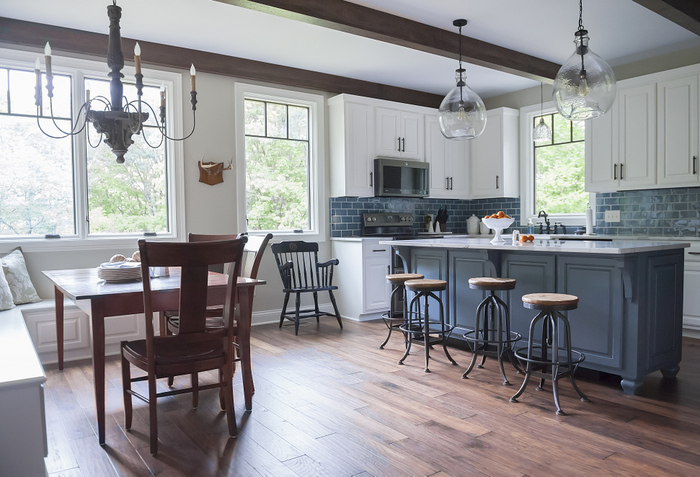
Next, we turned our attention to the dining space. I suggested we look for a candelabra-style overhead fixture for above the table for variety. This fixture is both wood and iron, and the arms are curved (rounded).
Melanie G Photography
4. Maintain a sense of scale throughout your overhead lighting scheme.
Since the island pendants were oversized, this overhead lighting in the dining area also needed to be oversized or else the scale would be off. You don’t want your fixture to be wider than the table beneath it. Any larger and this fixture would be too large, but because it’s airy it doesn’t come across as too heavy for this area.
Melanie G Photography
5. Repeat rounded forms, including orbs and drum shapes.
Next, there is a music-slash-tv room that is visible from the kitchen and living area. I chose a drum-shaped iron frame fixture with a small candelabra piece in the center. The fixture is rounded, iron, and repeats the candlelight of both the dining and living room overhead fixtures. Each fixture is quite different, but there is a common thread that keeps the lighting plan cohesive.
Melanie G Photography
6. Throw in an oddball, but maintain the shape or finish.
And finally, I picked a smaller galvanized fixture for the entry. It looks like an artisan piece, and it sets the vibe for the entire house.

Melanie G Photography
7. Don’t forget the lamps!
Did you think I forgot about lamps? After the overhead lighting is determined, I am mindful of the lamps that will populate the space. This pair of lamps sport orb bases that echo the living room fixture, but we softened up the look by choosing a gold finish and light shades.
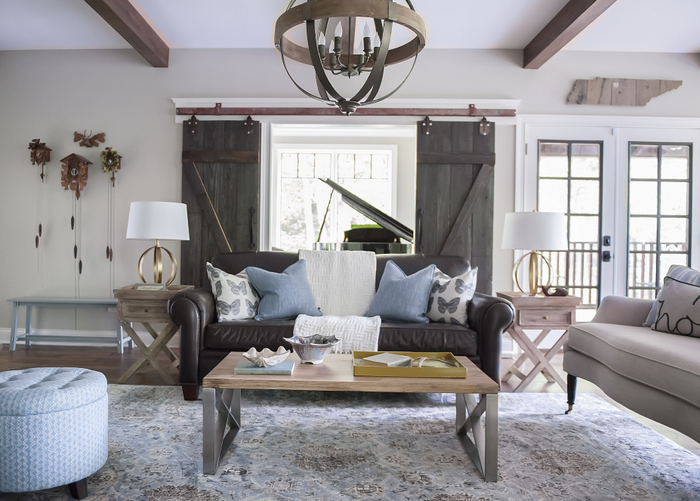
wall color – Ben Moore Hazy Skies, all photography – Melanie G Photography
Do you see how the light fixtures are tied together in differing ways, but are different enough to be interesting? Was this helpful?
I got to explain this a bit more with Meryll Rose on Nashville’s Talk of the Town! Check it out here: https://youtu.be/1d6bJ24MA8A


I loved the article! Very informative and your work beautiful!
Thanks so much, Holly! I don’t do a lot of modern farmhouse design, but they are quite popular here in Nashville. I think the kitchen is what makes this one so unique – I had a blast choosing the finishes for that space and seeing it all come together 🙂
What helpful advice! It took me years and years to learn what you have said in this blog, and I learned it only by trial and error. You are wise, Kristie!
Oh wow, thanks so much for the complement, Cherie! I hope it helps 🙂
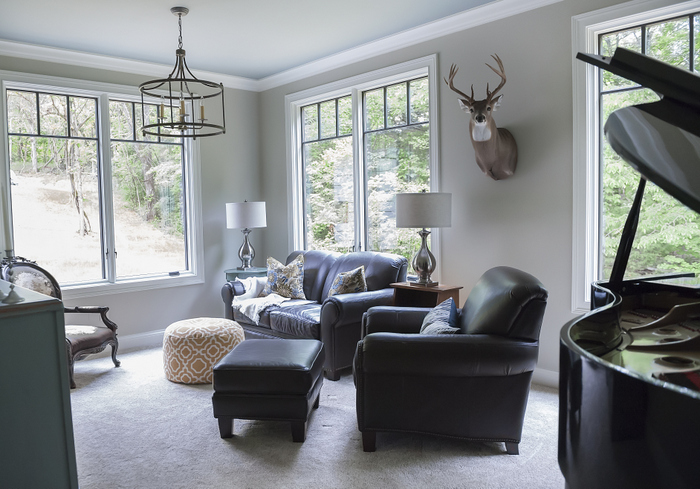
Besides the lighting fixtures, which I love, I also like that antler mounts were tastefully incorporated into the decor. I make my husband keep his in the basement for fear of them taking over the house and looking “campy.” What is the main paint color?
The husband is an avid outdoorsman, so he was happy to not have those delegated to the basement 🙂 The wall color here is Benjamin Moore Hazy Skies.
What a timely, informative article! Thank you, as we are getting ready to build a home. A first-time experience for us. Can you share your sources of light fixtures, or recommend good on-line resources
Thank you, Kristie
Brenda
I love Graham’s Lighting here in Nashville, but here is my best advice wherever you are: if possible, buy all or most of your overhead lighting IN ONE PLACE. That way, you can see the fixtures in real life, in the same space (or at least close), so you’ll know if the finishes and sizes are in keeping with all the other pieces you choose. Getting your lighting from many sources is a nightmare, in my opinion – it just makes it harder on you. Ordering this much lighting online is a gamble, one that I rarely take – I need to SEE the pieces in order to make the best choices for my clients.
This came right in time ! we choose the large ballard’s design Orb for the hall downstairs but upstairs in hall entry I’m not
loving the other light and its gives off a yellow glow. so I will use your suggestions.
Great! I hope it helps!
This is so enlightening in understanding the structure of room style. I never thought about repeating something in each fixture. Thanks.
You’re so welcome, Martell – I’m glad it helped!
I’m late making a comment. This was so helpful. I have a question that was not addressed. How do ceiling fans factor in? I live in Florida where most areas in my home have ceiling fans but I have some light fixtures. The only fans with high output that I could afford had an oil rubbed bronze finish. I was hoping to buy black light fixtures but now I’m wondering if I’m locked into the oil rubbed bronze now that I’ve replaced several fans.
Kristie, Once again thank you for this timely and pertinent article. Lighting selection – style and size – is rarely addressed in decorating articles and blogs. Your insights and suggestions are very helpful! Thank you!
Thank you, Amy – I’m glad you found this helpful 🙂
Hi Kristie, I have one more question. Is there a rule/formula you use in determining how much wattage is needed per sq footage of each room/space? Thanks for your expertise and enjoyable blog,
Brenda
Here’s my formula – the more wattage, the better! The more lighting sources, the more you can adjust to your liking at different times of day. Dimmers are awesome, too.
lovely spaces. I’m trying to track down the blown glass and iron pendants here in southern California. As you suggested, I’d really like to see them in person but if that is not possible, are you able to share the manufacturer and the pendant name? Thank you for any information.
Hi Kristie! I tagged this post as soon as I read it. You so clearly lay out the “how-tos” of interesting fixed lighting features that also make sense visually. I actually used your advice (and referred readers back to you) as a roadmap for my own lighting scheme for my foyer/stairs/second floor landing for my One Room Challenge this fall. Thought you might enjoy how someone else employed your tactics. 😉
http://homeglowdesign.com/2016/10/20/lighting-flow-without-boring/
Hi Kristy, Thank you for illustrating this so perfectly! The photos are so helpful. I can see how the chandelier over the dining area works so well because the weight of the center draws the eye right over the table, so the fixture does not read as too wide. I love how you repeated the shapes and finishes with subtlety. I followed the link in one of the comments and will get all my wish list photos together in one spot to check the flow. You have given me confidence that my instincts are on the right path. Thank you!
Kristie, not Kristy! I know that and still type it wrong! My aplogies!