You can transform a room, even without a budget for brand new furniture! I’m showing you the main living areas of one of the houses on the Tennessee Baptist Children’s Home campus that was part of the Meaningful Makeovers project undertaken by the Greater Nashville Chapter of RESA (Real Estate Staging Association) to benefit young girls experiencing family crisis.
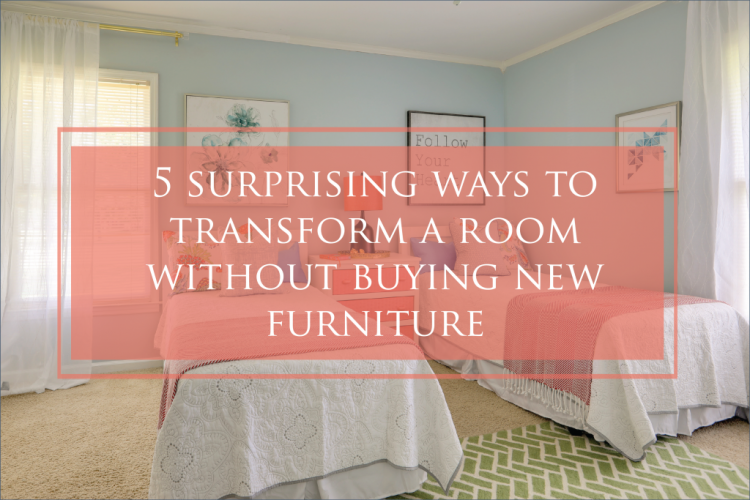
Along with one of the girl’s bedrooms and bath (see those transformations here), Elizabeth Scruggs (of Superior Construction & Design) and myself took on these three areas to improve for the children and house parents who live in this home.
1. Change Your Paint Colors & Placement
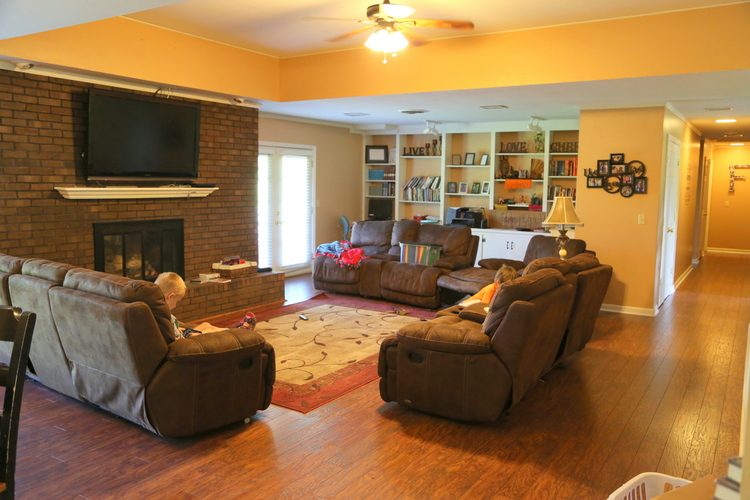
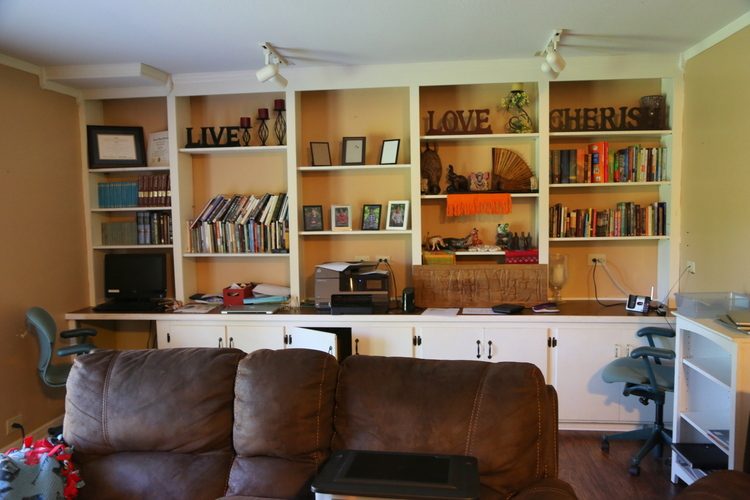
The first way to transform a room without replacing furniture is by changing the paint colors. While that’s no big surprise, what you might not consider is where and how to apply the new colors. Here’s the goldy-tan color of the living room in its “before” state:
 before
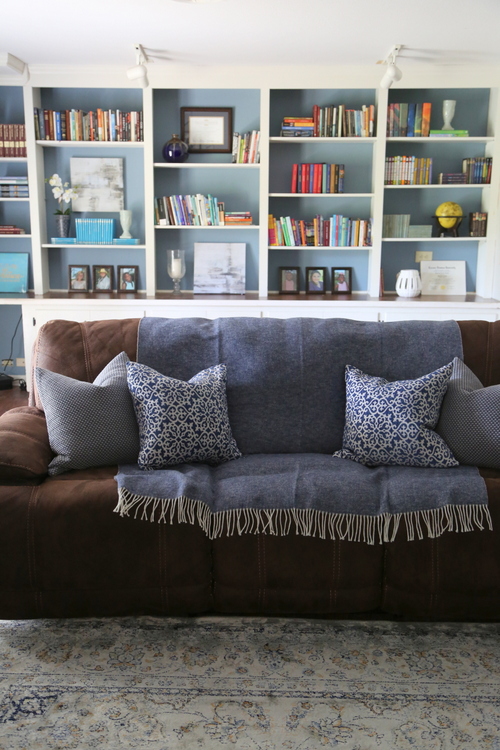
Lightening the wall color brightens the entire room, especially when you use an eggshell finish rather than a flat finish. The slight sheen reflects light, rather than absorbing it. This wall color is Sherwin-Williams Repose Gray SW7015:
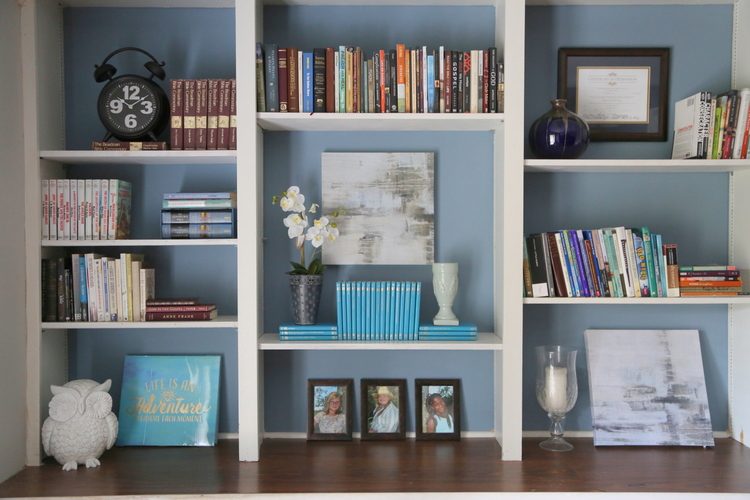
Did you notice what great “bones” this room has? Built-in bookcases, a huge fireplace, and hardwood floors, and two sets of french doors. You can accent your architecture with where you place the new paint colors. THAT DOESN’T MEAN AN ACCENT WALL. Accent walls are not only dated, but they can actually throw off the balance of a room if not used properly. Instead, try adding an accent color in the backs of bookcases. NEVER leave the backs of built-ins the same color as the walls in the room. That makes it appear less architectural or built-in, and more like you applied the shelves over the drywall:
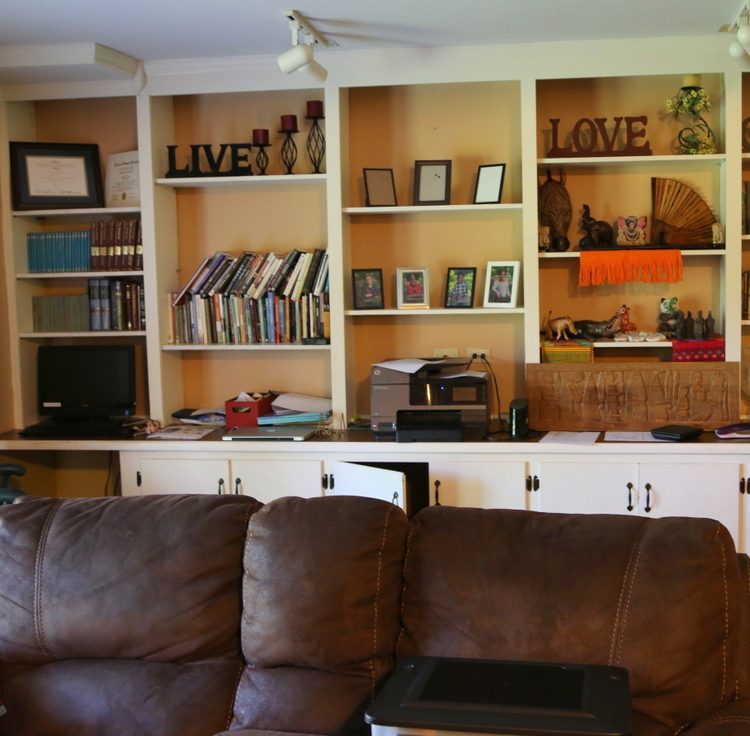
Painting the backs of the bookcases in an accent color highlights them and gives a great backdrop for books and decor. I chose Sherwin-Williams Poolhouse SW7603 for these bookcases that were styled by Elizabeth:
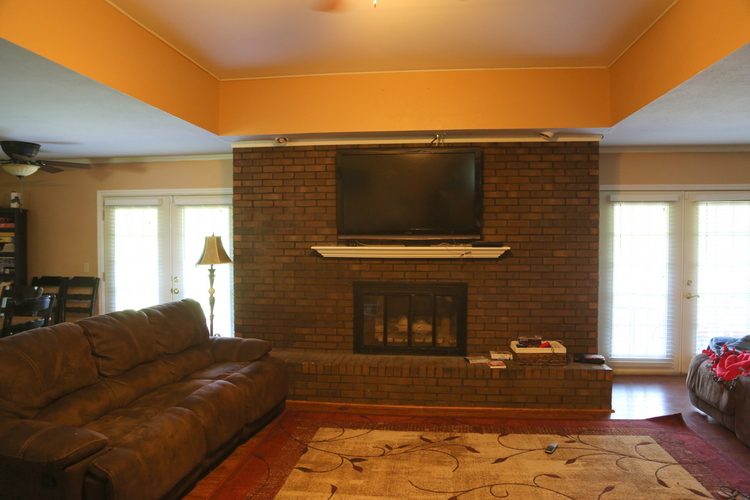
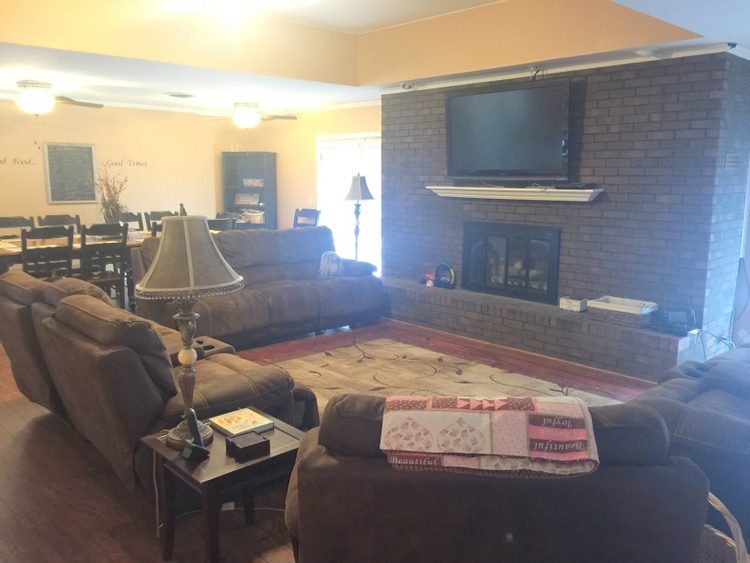
The dark fireplace was definitely a light-sucker in the place and the recessed ceiling was a bit of a bore:
 before
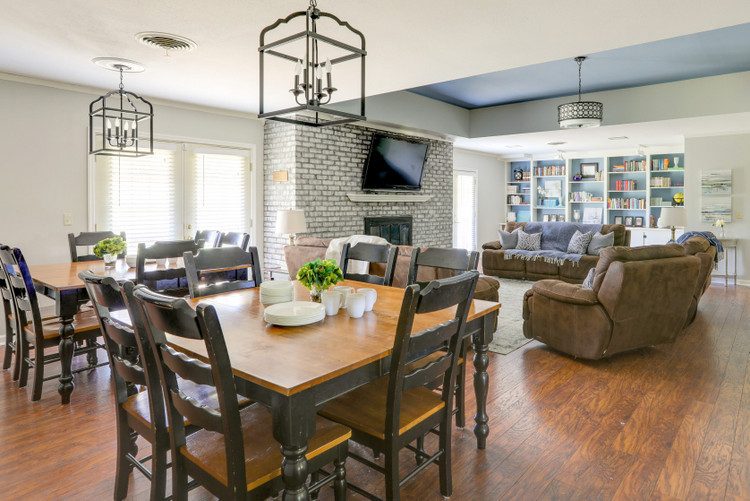
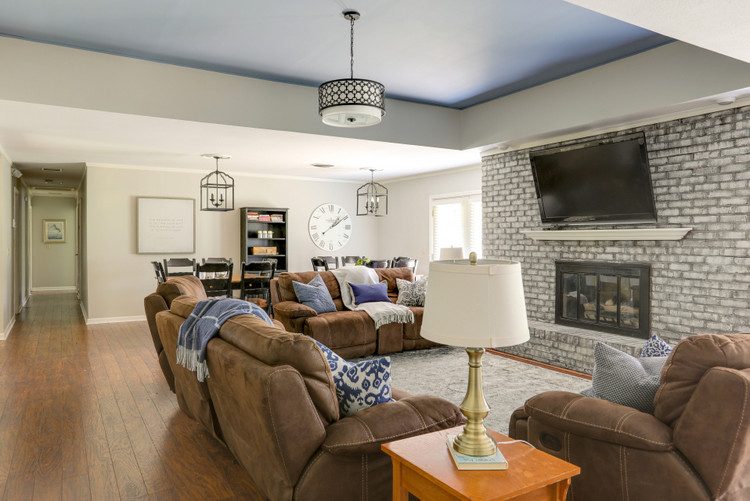
We repeated SW Poolhouse from the bookcases on the recessed ceiling area in the middle of this room, and lightened up the fireplace with some neutral paint and a bit of technique:
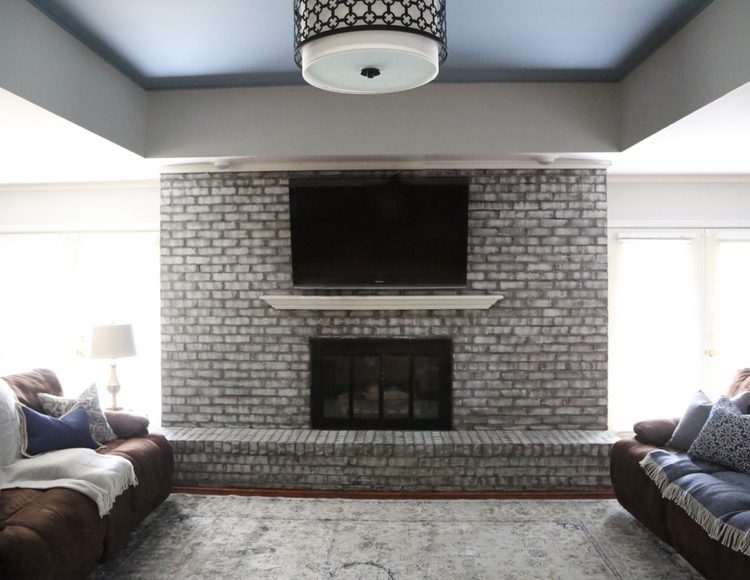
No primer required – I simply used the wall color as the base coat, letting some of the original brick color bleed through. Then I hand-painted the grout a slightly lighter color than what it was previously. Then I added the same color I used for the grout randomly on the painted brick for a white-washed effect. Although I usually hire a professional to do this, budget constraints required that I try this one on my own this time! It’s not perfect, but it’s a huge improvement over the previously dark behemoth!
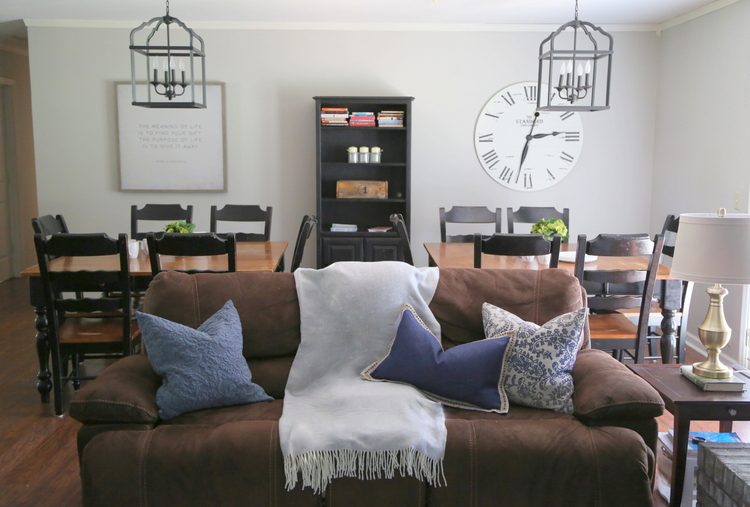
2. Camouflage Your Furniture
Is your upholstery dark and dreary? Stained or worn? An inexpensive way to transform a room is to update your upholstered pieces by applying a little camouflage!
 before
A beautiful throw or blanket can add color and texture, while providing some coverage where you need it.
Coordinating pillows distract you from the dated upholstery, too. Elizabeth Scruggs found all of the pillows and throws from Home Goods. Remember to add some pattern and texture like these, rather than resorting to solid pillows.

3. Update Your Lighting
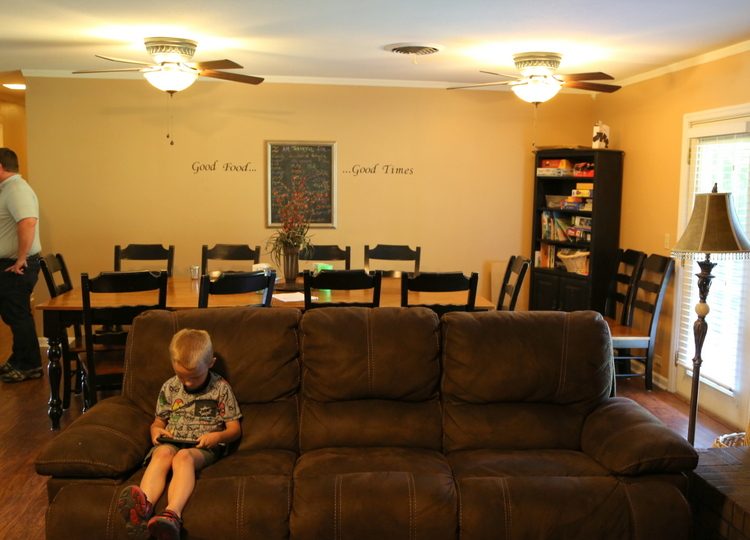
Changing out your overhead and lamp lighting can transform a room instantly. Dark or amber domes on your lighting or ceiling fans can make the room shadowy and will darken and change the color of everything they cast light on. Same goes for dark lamp shades.
 before
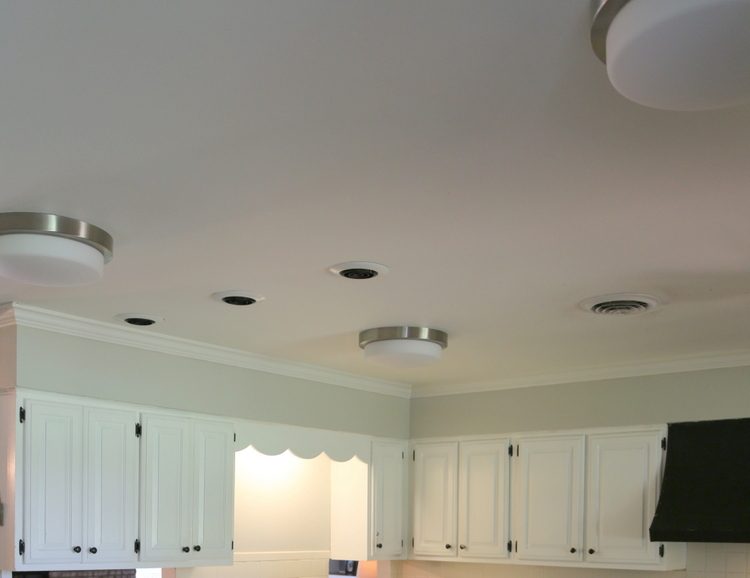
Elizabeth was able to secure a generous donation of lighting for this space and the kitchen from Ferguson’s Lighting in Lebanon, TN, and what a difference they made! Here’s a money-saving tip: for lantern style fixtures, choose those without glass. They are considerably less expensive as those that do, and you don’t have to worry about dusting the glass! Replacing lighting with exposed bulbs or white shades will greatly impact the amount of light in the room, plus the colors of walls and furnishings will look brighter and truer. Be sure to get frosted bulbs if they will be exposed, like this pair of lanterns in the dining area – otherwise, the glare may be harsh:
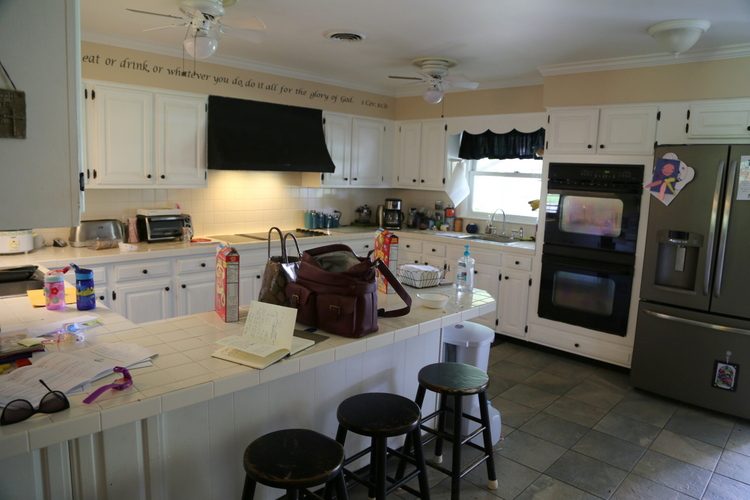
The kitchen ceiling was pockmarked with recessed lighting, ceiling fans, and a pair of nipple lights. Ugh.
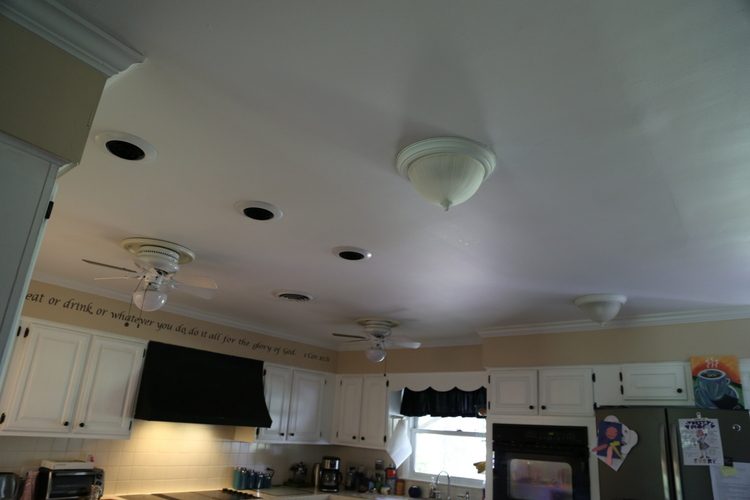 before
While we needed to keep one of the ceiling fans, we were able to replace three of the fixtures with simple yet updated improvements!
4. Reconfigure Your Existing Furniture
Duh, we all know that rearranging furniture in a room can make a big difference, but what about altering the furniture pieces themselves? I often break up too-large sectional sofas and reconfigure the pieces to better fit the room, but in this space noticed that there was an unexpected piece of furniture that could be reconfigured:
 before
This dining room has to accommodate up to 12 people, and what we initially believed to be one long table was actually 2 that were pushed together! By breaking them up, we changed the look of the space:
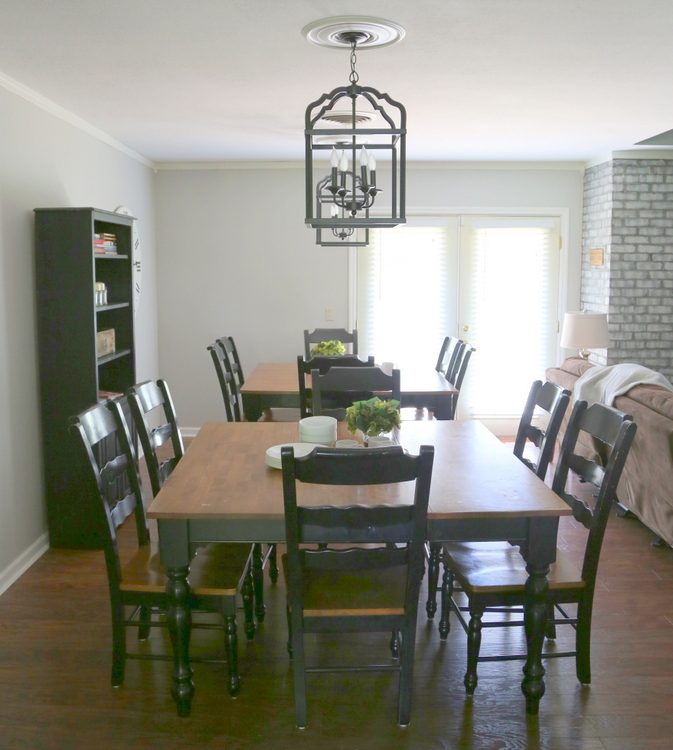
When the tables were together, they could seat 10. The separated tables can now seat up to 12! This change also solved another problem. See how the light fixtures were off-center above the table/tables?
 before
Breaking up those tables helps create some architectural balance and harmony!
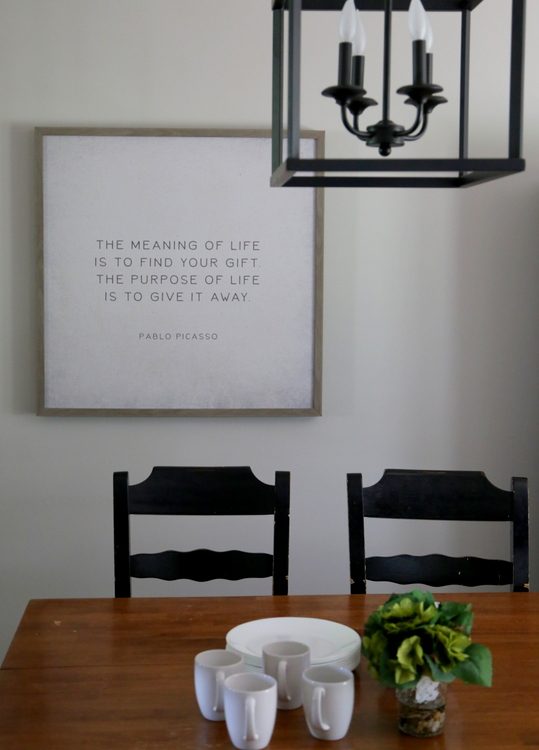 definitely my new favorite quote!
5. Find Ways to Visually Simplify
Another way to transform a room is to find ways to simplify it visually. Most people think of simplifying as pairing down or decluttering, which is definitely part of it. But visually simplifying involves analyzing how to calm down any busyness in the visual field. It’s not as difficult as it sounds, but you’ll need to take photos of your room to key into what may need simplifying. Look at this before shot of the kitchen and take notice of what draws your eye:
 before
I immediately notice the disparate strip of paint color above the kitchen cabinets. The color doesn’t relate to anything in the room, so it just looks like a stripe that chops the horizontal visual field. Choosing a lighter color than relates to the flooring will lesson the visual busyness. There are also too many black or dark pops throughout the kitchen, so I wanted to lessen a few of those, too:
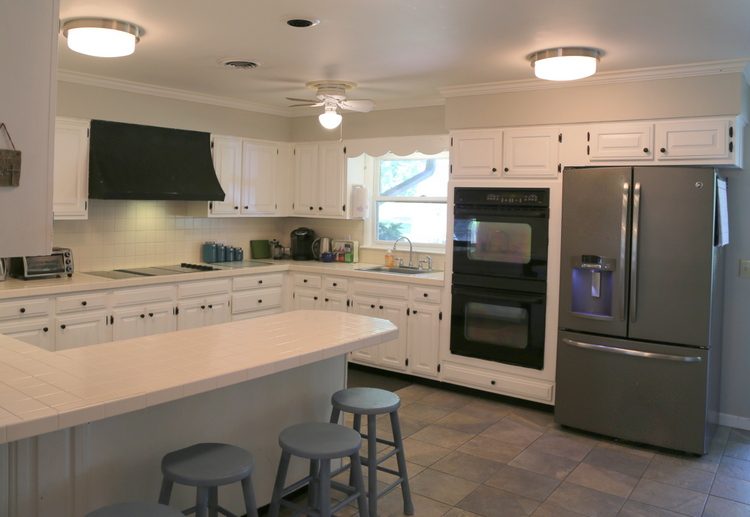
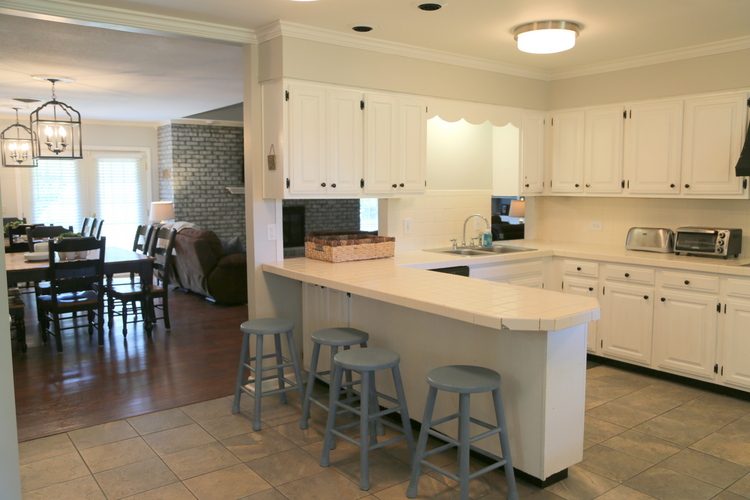
Rather than paint the bar stools white, I chose SW Poolhouse from the living room to weave a bit of our accent color into the kitchen. It’s a happy color that isn’t as harsh as the black.
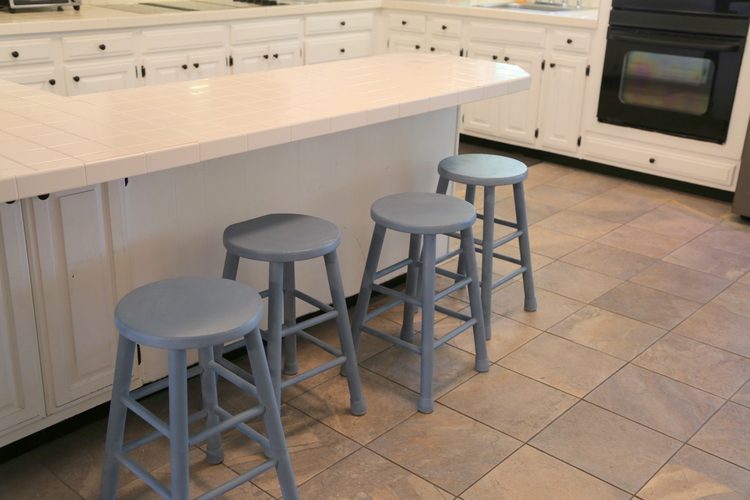
You may notice the dark stools looked as though they are wearing socks!
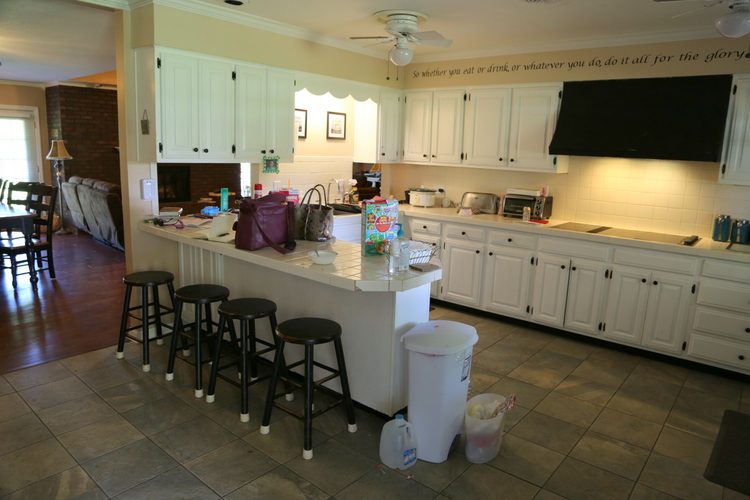 before
We simply painted the rubber feet the same color as the entire stool – it’s not rocket science 😉 A new large basket in the pass-though window provides a common place to drop keys, mail, and other things that often clutter up the countertop.
Here we are, happy (and relieved) that it all came together after a week of spent in this wonderful place where children in crisis are nurtured and loved.
 Elizabeth and me!
In case you missed it, be sure to check out the befores and afters of the bedroom and bath we redecorated, as well as the other bedrooms and baths transformed by other RESA members here. Thanks so much to Sherwin-Williams, who supplied most of the paint, Nashville Painting Solutions for helping us paint some of the larger spaces in this home, Clarcor Filter Foundation for donating funds for most of the decor, Ferguson’s Lighting in Lebanon for new lighting, and everyone who donated children’s books to fill up these and 5 other bookcases on the campus of Tennessee Baptist Childrens’ Home.
If you’d like to see the segment that aired on News Channel 5’s Talk of the Town about this home’s makeover, you can check out my interview and tour with Meryll Rose here.


Fantastic Job! Great info regarding accent walls, tray ceilings and built-in bookcases. I have used Sherwin Williams Pool House for a Lake House design job too!
Thanks, Natalie! This is actually the first time I have used Poolhouse, but I really like it. How did you use it? I bet it would be lovely in a bedroom.
Love it! Looks like hard work, but so rewarding!!
Thanks, Lesli! Definitely hard work, definitely rewarding 🙂
The rooms are beautifully done. Would make any child happy.
Thank you, Annette! I hope they do!
Beautiful job. So many great touches. My favorite has to be the lighting changes. Not only do the beautiful new fixtures add sophistication and interest, but the quality of the light itself is cleaner and brighter. Love it.
Darla,
I’m glad you noticed the quality of the light! We bought LED bulbs in Soft White and replaced all the bulbs in the house – it made such a big difference when all the bulbs were higher wattage and the same color temperature.
Now THIS is what it’s all about! You know I love your heart and love that it shows up in what you do!
Thank you so much, Pamm! I can say the same for you!
This makeover looks amazing!! I love your blog and I am always learning. Thanks for the explaining the “why” to your choices. Great tips that everyone can incorporate into their own homes. So kind of you to give back to such a wonderful organization.
Thanks for reading and commenting, Jenny. I’m glad you got some good take-aways from this post!!
So on point. Everything. The decor, the colors, the tips, and of course the reason for this project. Beautiful job, ladies!
Thank you so much, Amy! We loved doing this!
Kristie, what a truly wonderful makeover. It’s such a beautiful transformation. Can’t believe what a difference you were able to make with limited resources — now that’s creativity!!
Amy,
I’m nothing if not resourceful, haha! Thank you!
Great transformation, Kristie! What I especially love is that the furniture is the same type/style that I see in a lot of homes, and yet the changes you made make it look great! Comfortable, kid-friendly, yet still a beautiful room.
Thanks so much, Tracie!
Thank you for publishing this article! This is exactly what I do as a stager and color expert for my clients. Until they see for themselves how we can help, they don’t understand our abilities and that staging doesn’t have to cost tens of thousands of dollars and you don’t have to stage just when you are planning to sell your home.
The first thing I noticed about the kitchen were all the little black dots and hinges on the cabinets and drawers. They look like dice and are very distracting and should be toned down a bit. Don’tchathink? Too much busyness there!
I like that you explain what you did and you really, really didn’t replace or remove the furniture. Amazing transformation!
Thanks, Beverly. Sometimes you’ve got to work with what you’re given!
The transformation you ladies made to this home is nothing short of AMAZING. This is one of the best examples of before/after photos that I’ve seen that is addressing a home that looks like so many homes out there. Thank you for sharing your talents, knowledge, expertise and wisdom.
Thank you so much, Amy! Color is a game-changer 😉
What I noticed about the kitchen that was visually cluttering was all the black cabinet hardware. A hardware change was probably not a priority on this project, but I’m curious if it was something that you would have done if you were working on a client’s house with a bigger budget. I would at least have painted over the hinges or installed concealed ones.
Kate,
You’ll also notice we didn’t replace the dark, oversized seating in the living room. Budget . . . oh, and TIME. It takes forever to change out hinges! And painting over them makes for a long-term maintenance issue. 😉
Great looking makeover on a budget, it looks awesome! This comment really hit home:
NEVER leave the backs of built-ins the same color as the walls in the room. That makes it appear less architectural or built-in, and more like you applied the shelves over the drywall…OMG, I have this issue and the room is red.
This looks amazing! I always think I need to buy something new to update a space, but you have shown me that’s not true! I definitely want to paint inside my built in shelving now! Thanks for the inspiration!
You’re welcome, Barbara! I’m glad you got some ideas for your home!
When you asked what stuck out in the kitchen the most, it was not that funny strip above the cabinets but that huge black fan over the stove and the black ovens!…I would paint that fan the same color as the cabinets. Not much to do with the stoves though. Sorry. The black stools look much better now though 🙂
In the kitchen, you asked what clutter or whatnot, might be distracting to the eye. My eye immediately went to the two purses on the counter top, above the bar stools. Purse bottoms should not be placed on kitchen counters as they are placed in bathrooms (floors) and innumerable other places that render them laden with germs. I would urge readers to be mindful of this.
Otherwise, I enjoyed seeing the transformations.
You mean in the “before” photos? Ok, thanks.